
Sarah’s Gear Guide for Mount Elbrus
This post contains Amazon Affiliate links, which means we receive a small commission if you make a purchase using these links. This is what funds our website, and we only recommend products that we believe in.
I spent a lot of time researching gear for my climb on Mount Elbrus, and I wanted to share my experiences of that gear (good and bad) with you. I had a decent collection of winter gear already, but I wanted to make sure I was prepared for the worst possible conditions. Even though Mount Elbrus is considered an “easy” peak in comparison to the other Seven Summits, it only takes a little bit of bad weather to turn it into something dangerous. We experienced snow and wind on our summit day, and I was glad I had invested in a new jacket and gloves. For a more detailed trip report of my climb, click here.
This is not an all-inclusive equipment list, but instead a summary of some things I considered to be a valuable asset to my trip. If you would like a full gear list, I would recommend going to a tour guide’s website, such as Pilgrim Tours.
A note on prices: Some of these items retail for way more than what I usually like to spend on gear. However, you need to remember that high-altitude climbing, even “easy” climbing, can get very dangerous very quickly. So as you look at the prices ask yourself, “Are my fingers/toes/life worth the $100 I will save by buying a cheaper jacket/glove/etc.?”
My layering system:
I have a pretty good system for staying comfortable in the cold. My base layer is always a tight synthetic layer like the Under Armour Cold Gear long sleeve shirt. Next up I wear a half-zip fleece because they are lightweight, warm, and never seem to take on much water or sweat. Even when I take my fleece out of the wash it feels dry, and I think that's an important quality to have in winter apparel. Outside of my base layer and fleece will be an insulated vest (if it's REALLY cold), then my jacket(s).
Jacket: Mountain Hardwear Nilas Jacket
This jacket was by far the most invaluable piece of clothing on my trip. It is stuffed with 850-fill water-resistant down, which allows the jacket to maintain its loft even in wet conditions. It weighs 1lb. 10 oz. and packs down to the size of a Nalgene bottle, which meant I could keep it in my carry-on without taking up too much space. Speaking of Nalgene bottles, this jacket has two internal pockets that are large enough to hold your water bottles! This jacket far exceeded my expectations for warmth. I am ALWAYS cold. It can be 75 degrees in the summer sun, and I will still be wearing a sweatshirt curled under a blanket. In fact, I didn’t even realize it was possible to be comfortable outside in the winter until I got this jacket. I kid you not, this jacket is WARM, even in the bitter cold. It kept me warm through the entire snowstorm on summit day, and I stayed warm even when we stopped. I ended up getting a deal on mine from Amazon, which carries both the men’s and women’s styles.

Staying warm inside my Mountain Hardwear Nilas jacket and Outdoor Research Alti Mittens.
Gloves: Outdoor Research Alti Mitts

I call these gloves my “Everest mittens” because they are made for Everest expeditions. Because of my tendency to be cold, I wanted the best mittens I could get. These did not disappoint me! Just like my jacket, these mittens kept me surprisingly warm, even when we were stopped in bitter cold temperatures. The mitten has a PrimaLoft insulated liner which is warm on its own, and there is a pocket for hand warmers which I never needed to use. The outer glove is also insulated with PrimaLoft and has a Gore-Tex shell to keep it waterproof and breathable. I’ve had good luck with Outdoor Research products. They tend to be more reasonably priced, and they have a lifetime guarantee on all of their products. The only annoyance I noticed was that it was a little harder to hold onto my ice axe while wearing these gloves because of all the insulation. This is not a product issue, but instead me not being used to wearing really warm gloves! These gloves come in men’s and women’s styles. They have won several awards, including Backpacker Magazine’s “Best for Extreme Cold,” and Outside Magazine’s “Best Winter Survival Winter 2014”.
Goggles: Airblaster Airpill Goggle
I had the unfortunate experience of having to rent goggles for my Elbrus climb because I forgot to pack mine. As detailed in my trip report, my goggles fogged up on me during our nighttime summit ascent in a snowstorm, and I had a really difficult time seeing. Because of the constant fogging, I had to lower my balaclava which gave me some minor frostnip on my nose. I vowed to get myself a pair of good anti-fog goggles once I got home, and I opted for the Airblaster Air Goggle (now called the Airpill Goggle). It only takes one foggy experience to appreciate the value of a good pair of goggles! These goggles have been listed in Snowboarder Magazine’s best goggles list - “These things don’t fog. They’re inexpensive, basic, reliable, and you can see the world through them… The Airgoggle is near perfect.”

Ice Axe: Black Diamond Raven Ice Axe

We didn’t use our ice axe much on our climb – just a short stretch towards the end when things got really steep. There is no need for a fancy ice axe, which is why I went with Black Diamond’s basic ice axe. No frills and nothing too expensive, but a reliable brand to do the trick. I would recommend buying a leash for your ice axe in case you drop it.
Crampons: Black Diamond Contact Crampons

You will definitely need crampons since you will be walking on snow/ice the entire climb. I saw people climbing with super fancy crampons, but I did just fine with Black Diamond’s basic (a.k.a. cheapest) crampon. They strap onto any boot and make walking on glaciers a piece of cake.
GPS: Garmin Fenix
This is not a necessity for climbing Mount Elbrus, but I like wearing a GPS watch to track my mileage, speed, and altitude. The Garmin Fenix won me over for two reasons: 1) It measures altitude, which most GPS watches don’t, and 2) The battery life is up to 50 hours, which is ridiculously long for a GPS watch. The watch is waterproof up to 50 meters and has more features than I know what to do with. The only downside is that it is a bit bulky, but that has never bothered me. I use this watch every time I hike, paddle, run, bike, and climb, and it does an excellent job on the trail and later on the computer as it plots your trail on a map. Garmin has come out with newer versions of the Fenix, but I can’t speak on those since I have not used them.

Checking the altitude on my Garmin Fenix on Mount Cheget.
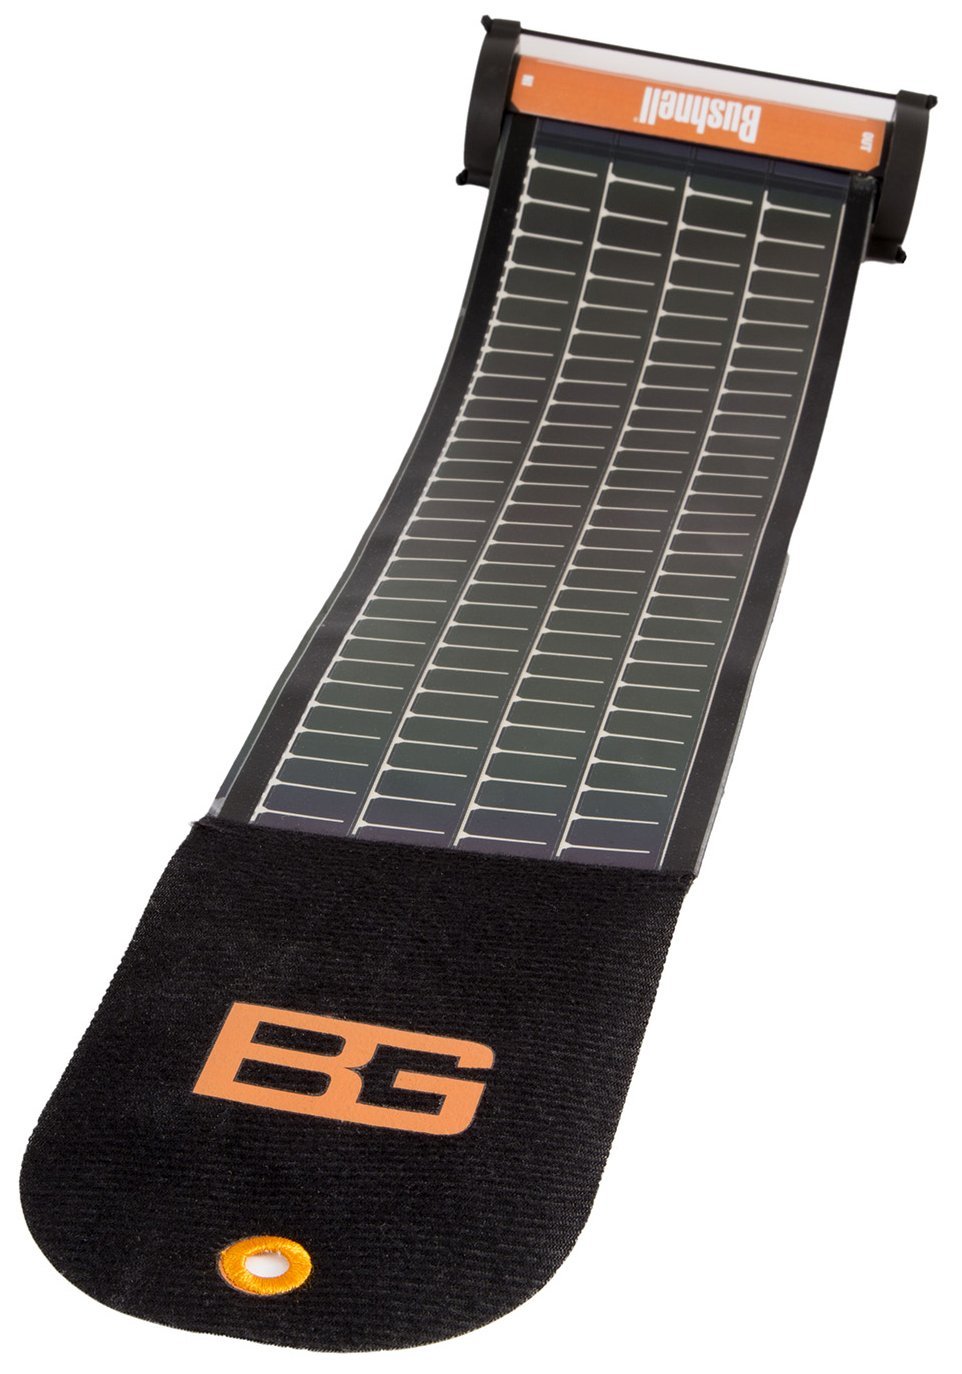
This was a nifty little charger that I kept with me at base camp. I used it to charge my GPS watch, but you can use it to charge anything that has a USB connection (phone, headlamp, iPod, GoPro, etc.). This is not a necessity, but it is also very tiny and doesn’t take up a lot of space. You can pre-charge the lithium ion battery pack in 4 hours using an outlet at home, but when you are out on the mountain, it unrolls into a solar panel that can recharge it as well. There are way bigger and more powerful solar panels out there, but this little guy is enough to keep things going when you’re away from civilization. I got mine here.
Headlamp: Black Diamond Icon Polar

I did not do a good job picking out a headlamp for my Elbrus climb. I used my Black Diamond Spot headlamp because it has always treated me well on my other adventures. As expected, it was as good of a headlamp as it always is… until summit day. Summit day started at 2am in a snowstorm with blistering winds and chilly temperatures, and my batteries died quick in the cold! It didn’t take long before I was walking in a near-whiteout with foggy goggles and a dim headlamp, and it was just plain awful. If I were to do this trip over, I would opt for a headlamp with an external battery pack that I could keep warm in my jacket, such as the Black Diamond Icon Polar headlamp. Another headlamp I like from Black Diamond is the ReVolt because it has USB charging capabilities (which would work well with the solar charger above), however I’m not sure how the batteries would do in the extreme cold.
Sleeping Bag: Big Agnes Anvil Horn 0
We had the luxury of sleeping in the Barrel Huts on our climb, so I was way over-prepared with my sleeping bag. I used my Big Agnes Edna -5 degree sleeping bag, and I was toasty warm every night. I like Big Agnes sleeping bags for a few reasons. For one, they are reasonably priced. Second, they save weight by removing the insulation from the bottom of the sleeping bag in the torso area because your body weight is going to compress the insulation anyway, rendering it useless. Instead, you get your bottom insulation by sticking your sleeping pad in a pocket on the bottom of the bag (which also prevents you from rolling off your sleeping pad at night). Big Agnes also has the cute option of choosing whether you want your zipper on the left or right so that you can zip together two sleeping bags. Big Agnes doesn’t make the Edna sleeping bag anymore, but it is super light, super compact, super warm, and not too constricting, and I imagine their newer bags are very similar. If I were to buy one now, I’d get the Anvil Horn 0 (women’s version is the Daisy Mae 0). These bags were designed with comfort in mind and have water-repellent down so you never lose your loft in wet conditions.

Big Agnes Anvil Horn 0

Big Agnes Daisy Mae 0
Sleeping Pad: Nemo Astro Insulated Sleeping Pad
Although we had a tiny “mattress” to sleep on in the Barrel Huts, I still brought my sleeping pad to give me insulation and comfort. The Nemo Astro Insulated sleeping pad is lightweight and packs down to the size of a Nalgene bottle, so it really wasn’t taking up too much space or weight. I have been in love with this sleeping pad since the day I got it. It is 3 inches thick and feels like I am sleeping on a cloud. The horizontal baffles make it easier for the pad to curve with your body and prevent you from rolling off the pad like vertical baffles would. This may sound silly, but I often feel guilty when I go camping with friends because I feel like I shouldn’t be this comfortable when I’m sleeping out in the woods. This pad has won several awards from places like Backpacker Magazine and Outdoor Gear Lab. The only downside of this sleeping pad is that it’s not self-inflating, and it takes a lot of air to get it blown up. At high altitude, I wouldn’t be surprised if I passed out trying to blow it up. To fix that, I bought a nifty bag called the Thermarest NeoAir Pump Sack. This functions as a large stuff sack, pack liner, and most importantly a vessel to blow up your sleeping pad. Not only does it save your lungs, but it also prevents moist air from your body from entering your sleeping pad. The way it works is there’s a hole at the bottom of the bag that seals over the valve of the sleeping pad. You open up the stuff sack and roll down the opening to trap air which you then push into the sleeping pad. It is a simple device that works surprisingly well.

Nemo Astro Insulated

Thermarest Neo Air Pump Sack
Backpacks: Osprey Stratos 36 and REI Traverse 65

If you get a guided climb of Elbrus, you will likely take the South Route, in which you take chairlifts up to Base Camp at the Barrel Huts. Because of this, we were able to bring two backpacks with us: One bigger pack to hold your necessities for your days in the barrel huts, and a smaller pack for your summit attempt. There are so many backpacks out there now that I would go with whatever is the most comfortable for you. I personally like Osprey because they make a good quality product with useful features, but there are other good quality brands out there as well. Osprey packs can be a bit pricey, but you get what you pay for. My summit day pack was an Osprey Stratos 36. One thing I liked about it was their “Stow-On-The-Go” trekking pole attachment, which allows you to stow away your trekking poles without having to take off your pack. They also had just the right size and number of compartments to fit my needs. My big pack was an REI Ridgeline 65. One feature I liked about this one was a front zipper that allowed access to gear that was buried towards the bottom of your bag. REI doesn’t make this backpack anymore, but their Traverse 65 Pack looks very similar and also has a 65-liter capacity (the men’s version is a 70-liter capacity).
Mountaineering Boots
I have the luxury of living ten minutes from the University of Maine, who happens to rent out mountaineering gear through their outdoor program. Knowing I wouldn’t be using mountaineering boots for much other than my Elbrus climb, I opted to rent a pair. This worked out perfectly for me since I really didn’t feel like spending hundreds of dollars on a pair of boots I’d only use once in the next five years. You can also rent boots when you get to Russia, but I didn’t want to take a chance with that. Mountaineering boots are a must-have, and they are surprisingly warm. Normally I need to stick toe warmers in my shoes to keep my feet warm, but I didn’t even need them with my mountaineering boots. I am not in a place to recommend a specific type of boot, but I would encourage you to consider renting a pair if you don’t think you’ll be doing much more alpine climbing in the next few years and are on a budget. Also, be sure your crampons are compatible with your boot.
Cameras: Canon Rebel T4i and Canon Powershot

Canon Powershot
To some, a camera may not be considered a necessity on any climb. For me, a camera is invaluable. I brought two cameras with me. The first was my nice DSLR camera, a Canon Rebel T4i (newer version is the Canon Rebel T7i). On the scale of cameras, this one is the cheapest camera in Canon’s DSLR line. It takes amazing photos, and I have captured some beautiful shots with it, from the Northern Lights to bald eagles to canoe-racing wipeouts. I brought two lenses: the standard 18-55mm lens that came with the camera and a 75-300mm telephoto lens. For our summit day, I wanted a camera that was light and little. I used a Canon Powershot, which took way better photos than I expected. It did a great job capturing the colors in my photos, and the battery didn’t die on me on the summit (I made sure to keep the camera and spare batteries in my jacket or sleeping bag the entire trip).
Food
My biggest piece of advice for trail food is to bring stuff that you can eat frozen! Several of my go-to hiking snacks (Lara Bars, Clif Bars, Rx Bars, etc.) turn into frozen blocks of ice in the cold which are nearly impossible to eat. You can overcome this problem by sticking some bars in a warm inner pocket of your jacket, but in general stick with things that won’t freeze. Below are some of my favorite winter snacks:


Go Raw Spirulina Sprouted Bites – These might look and sound like some weirdo hippie food (and maybe they are), but these things are DELICIOUS! They are dehydrated crackers made from bananas, sesame seeds, coconut, dates, and spirulina. They have a nice rich taste to them and just taste heavenly (like a banana coconut smoothie). When I bought them at our natural living store the cashier said, “These are my favorite!” Since they’re dehydrated, they won’t freeze in the cold weather and you won’t break your teeth trying to eat them. The only downside: they’re expensive! If you have a dehydrator, try out this recipe to make them at home! Their lemon flavor is also very good and tastes like a lemon cookie!
Fruit leathers – Fruit leathers are my favorite way to get a quick sugar fix. They’re like fruit roll ups, but it’s purely dehydrated fruit with no added sugar. We’ve made our own fruit leathers before with our dehydrator, but they’re usually all in our bellies before the day is even over. My favorite fruit leathers are the Stretch Island fruit leathers and Simply Balanced (Target brand) fruit leathers. Dale also likes Pure Organics fruit leathers. I find that the Simply Balanced brand is the softest consistency which makes it easier to bite into when they are cold.
Wella bars – These are peanut butter and almond butter bars, and were pretty much the only bars I had that didn’t freeze up on me. They are stored in the refrigerator and actually “melt” and soften up at room temperature, so they are a perfect consistency when they get cold. I buy my Wella bars at Sam’s Club.
Trader Joe’s Dark Chocolate Honey Mints – These chocolates are the best! Trader Joe’s makes an awesome dark chocolate candy that has a mint honey filling. The great thing about them is that they don’t freeze, and they are still soft when you bite into it in frigid temperatures. The link takes you to an overpriced version on Amazon, but in store it is much cheaper. Dale and I are addicted to these chocolates, and luckily (or unluckily), the closest Trader Joe’s is 2 hours from us, which forces us to NOT eat too many of these!
Trail mix – I usually get my trail mix in bulk at our Natural Living Center, as long as it doesn't have artificial sugar in it. It’s dense in calories, and you don’t have to worry about it freezing on you!
Miscellaneous Items
Snow pants – Eddie Bauer Igniter Pants – For this climb, I used Eddie Bauer’s insulated Igniter snow pant. These pants were extremely warm and had a full-length zipper up the sides of both legs to allow you to keep your boots on when you change pants. Eddie Bauer does not make these pants anymore, but I would not hesitate to buy another product from their First Ascent line, which has treated me well multiple times in the past.
Balaclava – Outdoor Research Windstopper Gorilla Balaclava – This fleece-lined balaclava contains Gore Windstopper fabric which does an excellent job at shielding your face from the harsh alpine winds. It did a great job keeping the wind out of my face, and it has an adjustable venting system. Built for harsh alpine weather.
Gaiters – Outdoor Research Expedition Crocodile Gaiters – This is the heaviest-duty pair of gaiters made by Outdoor Research. It is designed for extreme conditions, and the large circumference will accommodate thick snow pants and mountaineering boots.
Luggage scale – I always struggle to keep my suitcase under 50 pounds, and this little thing has been a life saver on so many trips.
Russian dictionary – Lonely Planet Russian Phrasebook & Dictionary – When I was with my guide, there weren’t many language barriers, but I definitely struggled at the airport. This book is good because it’s tiny and gives you translations for commonly used phrases, not just words.
Journal – I bring a journal every time I travel. It gives me something to do in my down time, and it’s a good way to remember the little things that I may have otherwise forgotten. I have never regretted writing a journal on any of my trips.
Pulse oximeter – This is definitely not a necessity, but it sure is a fun toy to play with when you’re bored at base camp. This device measures your heart rate and percent oxygen in your blood. Normal O2 saturation is 98-100%, but when you’re at high altitude, it can dip down to the 70% range or lower (until your body acclimates). Don’t take these readings too seriously, though, because cold fingers can give you a falsely low reading.

Using my pulse oximeter at Base Camp. Clearly I have not acclimated yet!