
2018 Growing Recap - "Watson"
This post contains Amazon Affiliate links, which means we receive a small commission if you make a purchase using these links. This is what funds our website, and we only recommend products that we believe in.
Introduction
My name is Sarah Whitty, and I have been a serious giant pumpkin grower for the past 4 years. I was plagued with three years of bad luck before growing a 1521.5-pound pumpkin in 2018 that some may remember as “Watson”. I’m going to share with you the details of what I did this past growing season and what I learned from it. Everything I did was a result of extensive research and adjusting my game plan each year based on what worked and what didn’t. If this is too detailed and you’d like to start with a more basic guide, read my article, “How to Grow a Giant Pumpkin”.

Why Watson?

Maine is cold. The winters are long, and summer is never long enough. Although pumpkins love our long days in the summer, they also like warm weather, and that poses a challenge in the spring. The biggest pumpkin ever grown in the world weighed 2,624 pounds. It was grown by the Belgian, Mathias Willemijns, who starts his seeds on April 2. In Maine, there is still snow on the ground on April 2, so the idea of having warm soil and ideal growing conditions is laughable. The only way to be competitive with the best in the world means I need to go into an all-out war with mother nature… with electricity. Basically, I put a space heater in each of my greenhouses to keep my seedlings at an ideal temperature of 80-90 degrees during the day (which is aided by the sun). The last frost-free date in Bangor is in the end of May, so I keep these heaters running nearly 24/7 until the nighttime temperatures get to be above 50 degrees. Long story short, my electricity bill goes through the roof in April and May. While chatting with my mom about it, she suggested the name “Watson” to reflect the wattage used to grow him. Below you can see a graph of my electricity usage. The date on the horizontal axis represents the last day of the billing cycle. As you can see, my electricity usage jumps in the months of April and May, despite having significantly warmer daytime temperatures. It’s nearly quadruple what I use in the summer months!

The seed
One thing I did different this year was using a “proven” seed: the 1985 Miller. A proven seed isn’t necessarily a seed from a big pumpkin, but instead it’s a seed that has produced big pumpkins in future years. Although the 1985 Miller isn’t the best proven seed out there (that award would go to the 2145.5 McMullen), it was still a solid seed that I was able to acquire at an online seed auction.
The soil
I do a soil test in the spring once the ground thaws. In prior years, I used the University of Maine to test my soil because they were 10 minutes from my house. This past season, I mailed my samples to Western Laboratories based on a recommendation by Ron Wallace. The soil scientist at Western Laboratories has gathered extensive data on giant pumpkins over the years and is aware that these beasts require a much higher quantity of nutrients than your average household plant. Western Laboratories has a great “Secret Vault” program in which you send them a pre-amendment soil sample, post-amendment soil sample, as well as five soil and tissue samples throughout the growing season. The tissue testing is done on the petiole (stalk of the leaf), and this allows the lab to see what the plant is taking in vs. what is in the soil, and they give you fertilizer recommendations to get everything balanced to a perfect level (specifically for a giant pumpkin). I would highly recommend this to anyone who is serious about growing giant pumpkins. One thing I am changing this year is that I will be adding compost at the very beginning of the season. My busy life set me behind in picking up compost last year, and I applied it several weeks later than I should have. Compost is full of nitrogen (and other nutrients), and that nitrogen is really important in growing the greenery of the plant. Nitrates are particularly susceptible to leaching which is why it’s important to amend with this in the spring. Although my plant grew really well with the head start I had, it could had grown faster if I applied this compost sooner.
Seed starting
I planted my seeds April 2. This is crazy early for Maine, and there is always snow on the ground when I start my seeds. This may not be the best way to do things, but it’s how I do it. I chose to start my seeds earlier after reading the diaries of the top growers in the world who start their seeds around this time. They have the advantage of growing in a greenhouse, but I have my methods of getting a head start on the season that I will elaborate on below. I prepare my seeds the same way Ron Wallace has outlined in his newsletter articles. I first file down the edges of the seed (not the tip where the root comes out) and dip it in a 10% bleach solution to kill any pathogens. Then I soak it in a half-strength humic/fulvic acid and seaweed solution for 1 hour. Next, I wrap it up in a damp paper towel (with the humic acid and seaweed solution), place it in a plastic bag, and put it in my germination chamber for 12 hours overnight (at a temperature of 85-90 degrees). My homemade germination chamber is a Sterilite 18 gallon storage tote with sand on the bottom and two incandescent light bulbs (each in an aluminum reflector) on top of the sand (they are the source of heat). I have a rack (the kind you use for cooling cookies) that I place my seeds on, and then I place a thermometer inside and cover the chamber with plexiglass.

After 12 hours, I place each seed in a 4-inch pot and water them with a solution of Rootshield Plus (this is a biological control that helps protect against fungal disease). The seeds emerged three days later on April 5. They were placed under grow lights for 16 hours a day. Five days later I transplanted them into gallon pots because they were already starting to get root bound. Before using the gallon pots, I cut them in half and then put them back together with duct tape. That way when I transplant them, all I have to do is remove the duct tape to make it easier to remove the pot and place it in the transplanting hole. After transplanting in the 1-gallon pot, I watered them with ROOT, Companion, and Actinovate. These are more biological controls that help protect against pathogens. When I planted the seeds (and transplanted them), I added both mycorrhizae and Azos to the soil. As Ron Wallace stated in one of his articles, “Inoculation with biologicals must start from the very beginning to ensure proper colonization”. Aside from the mycorrhizae and Azos, all these other products were new to me. The season prior to this one, my pumpkin was doing great when it suddenly stopped growing and all the leaves died at a rapid rate. I tested my soil for diseases (Western Laboratories has a test you can do for diseases specific to giant pumpkins), and it turns out my soil had extremely high levels of Fusarium and Pythium which are very difficult to eradicate, even with strong chemical methods. It’s hard to say if these products actually helped, but I will say my plant did not get any diseases last year, so I will continue to use these products again this year. Make sure to read your package labeling. Rootshield Plus needs to go in the freezer, otherwise it has an extremely short shelf life.
Preparing the Patch
At the end of March, before planting my seeds, I am already getting my pumpkin patch ready. Basically, this involves shoveling all the snow out of my patch and setting up my hoop house to begin warming the soil. I use a “cheap” 10’ x 20’ hoop house, and I keep this up until the plant grows out of it. I continue to keep the framework for the hoop house set up because it gives me a place to put hail netting over if we have a big storm coming. Once the soil dries, I apply my amendments, lightly till them in, and then place soil heating cables 12 inches down into the soil. I leave the heating cables in all season, but I unplug them once the weather is consistently warm.

This year, Dale helped me cut down our dying sugar maple so that the patch could get more sunlight. After making our last batch of maple syrup, Dale got out the chainsaw and took care of business!


Transplanting
I transplanted my seedlings outside on April 17. This was a little later than expected because of all the wintry weather we had and a busy work schedule. You don’t want to wait too long to transplant them because the pots will get root bound which limits how much the roots will spread out once you transplant them. I have small space heaters in each of my greenhouses to keep them warm, and I have LED lights above the plants to given them some supplemental light. I don’t know if these lights actually help, but I had a great start the year before when I used them so I’m not going to change that!

Watering
I barely water at all before the fruit sets because I’m trying to encourage the plant to spread out its roots in search for water. Once the fruit sets, however, I water like crazy. This is one area that I still haven’t come up with a good routine. I don’t like the idea of using an overhead watering system because I want to water the roots, not the leaves (although the leaves are shaped to channel the water down the stalk so it gets right where the roots are). The leaf cover makes it hard to evenly water the soil, and it also sets the plant up for getting fungal diseases like powdery mildew, particularly if the water doesn’t evaporate before nighttime. I have not had the time to play around with drip tape, although I’m nervous this will leave dry areas in the soil where there is no drip tape. Because of my inability to set up a good watering system, I water by hand 1-2 times a day. I don’t have a set amount that I water, but instead I stick my finger in the soil to see how dry it is and gauge my watering from that. This is very tedious for me because I usually crouch to the ground and water underneath the leaves to make sure I’m permeating the soil. This is very time intensive, particularly when the plant gets bigger. I use an industrial fireman’s style hose nozzle which works great. I’ve read many diaries on watering, and the average I’ve come up with is 100-150 gallons per plant per day. Based on my math for my hose output, that’s about 15 minutes of watering per plant per day. You may need more water if you have sandy soil and no rain, but you may also need less if you have more clay in your soil and a rainy year. If you water too little, your pumpkin won’t gain as much weight, but if you water too much you risk splitting your pumpkin and/or creating a wet environment that the fungal diseases love. Watering is tough, and it’s something I’m still working on mastering.
Feeding

Most of my feeding schedule is based on the results I get from my Western Laboratories soil and tissue test results. The season prior to this, I did not do regular soil tests and learned later in the season that I was applying WAY less potassium (a major nutrient required for fruit growth) than I should have. I use Growth Products 0-0-25 for potassium, and I think my frequent use of this helped greatly in getting a personal best. Initially I was only applying it every 10 days, but later in the season I was using 7 ounces twice a week, and my soil/tissue tests were still coming back low in potassium. I used Ron Wallace’s feeding schedule as a basic guideline, but I made adjustments based on soil/tissue testing. I am still perfecting a feeding schedule, but have outlined what I use as a general guideline throughout the season. As the season progresses, I become more aggressive with my feeding frequency.
This past season was my first time using micronutrients, both in sulfate and chelate form. The chelate form is absorbed by the plant quicker, and Western Laboratories recommends doing half of their recommendation using the sulfate form, and half chelate (which is so potent you divide the recommended amount by 5). Be aware that manganese chelate applied to the soil can worsen manganese deficiency because it will convert to the more stable iron chelate (foliar application is okay). Also, be careful with copper-containing products if you use TKO Phosphite. You should avoid application of copper products 20 days prior to the application of TKO Phosphite and for 10 days after the application of TKO Phosphite.
Burying vines
I used a new method of burying vines this year that was inspired by Ian and Stuart Paton (they have a good video on YouTube explaining this method that I have shown below). Before doing anything, I sprinkle 1 tbsp of Azos and 2 tbsp of mycorrhizae (I use Ron Wallace’s Pumpkin Pro) to each leaf node and the soil surrounding it. This is WAY more than I used to use, but several top growers have had good results using a hefty amount of these products. On another note, there is data that suggests mycorrhizae don’t thrive well in high-phosphorus soils, so it is entirely possible we are wasting our time and money by doing this. Instead of digging a trench and burying the entire vine in the soil, I use a 1-gallon pot filled with peat moss (completely saturated/dripping with water, and also watered with a solution of Rootshield Plus and seaweed) and place it over each leaf node. This is even more time intensive than the classic burying vines, but I like it a lot better because the vine doesn’t get wet/rot, and the pot prevents the root from drying out as easily than if you just had a few inches of soil over it. After a few weeks, the peat moss in the pot dries which keeps the buried area of the vine free from rotting. I also noticed that by using this method, I had significantly more top-forming roots than I have had in the past. The only downside is that the pots are expensive (particularly when you need hundreds of them), so if you can’t afford 1 gallon pots, another option that worked for me (but to a lesser extent) was to use old yogurt containers, instant soup containers, ice cream cartons (washed with bleach), or paper Solo snack bowls.


Plant size/shape

I had the primary vine running straight and the secondaries going out 15 feet on each side. The three secondaries before the pumpkin on each side were curved 90 degrees once they hit the 15-foot mark, and then they were allowed to grow to the far edge of the patch (which is about 30 feet from where the stump is) in the same direction that the primary goes. On the secondary vine before the pumpkin on each side, I let tertiary vines grow as shown in the diagram. I let the primary grow the entire season to remind the pumpkin that it is still growing, but I pruned all secondaries after the fruit. The reason I do this is because the vines before the pumpkin are the main source of water and nutrients, and anything that grows after the pumpkin is a potential waste of the plant’s energy. The tip of the vine does secrete growth hormones that tell the pumpkin to keep growing which is why I let this grow the entire season (it naturally slows down once the fruit starts growing). The pumpkin was 14 feet down the main vine. It had 6 lobes and was pollinated on June 17.
Pest control
I plant a trap crop, a blue hubbard squash, on the edge of my patch because the cucumber beetles like the taste of these leaves better than the pumpkin. I kill the cucumber beetles and squash bugs by hand when I see them. I use organic pesticides (Spinosad, Neem oil) ONLY on the blue hubbard squash, and this actually reduces the bug population significantly in all areas of the garden. I remove all flowers on the blue hubbard squash so that the bees don’t ingest any pesticides (organic pesticides can kill bees too). The reason I only use pesticides on the blue hubbard squash is because I don’t want to kill any of the beneficial soil organisms, some of which I just spent a bunch of money to amend with! I use duct tape to remove squash bug eggs from under the leaves. It works great! Be very careful with cucumber beetles because they can transmit bacterial wilt. This basically causes the entire vascular system of the plant to clog up, causing the leaves to wilt and die. Bangor does not have squash vine borers (yet), so this is a pest I do not need to worry about.
Towards the end of the season, I had a huge mouse problem. I placed moth balls around the pumpkin, and this did a great job deterring them. Don’t place mouse traps by the pumpkin because that will just attract more.
Damariscotta Pumpkinfest
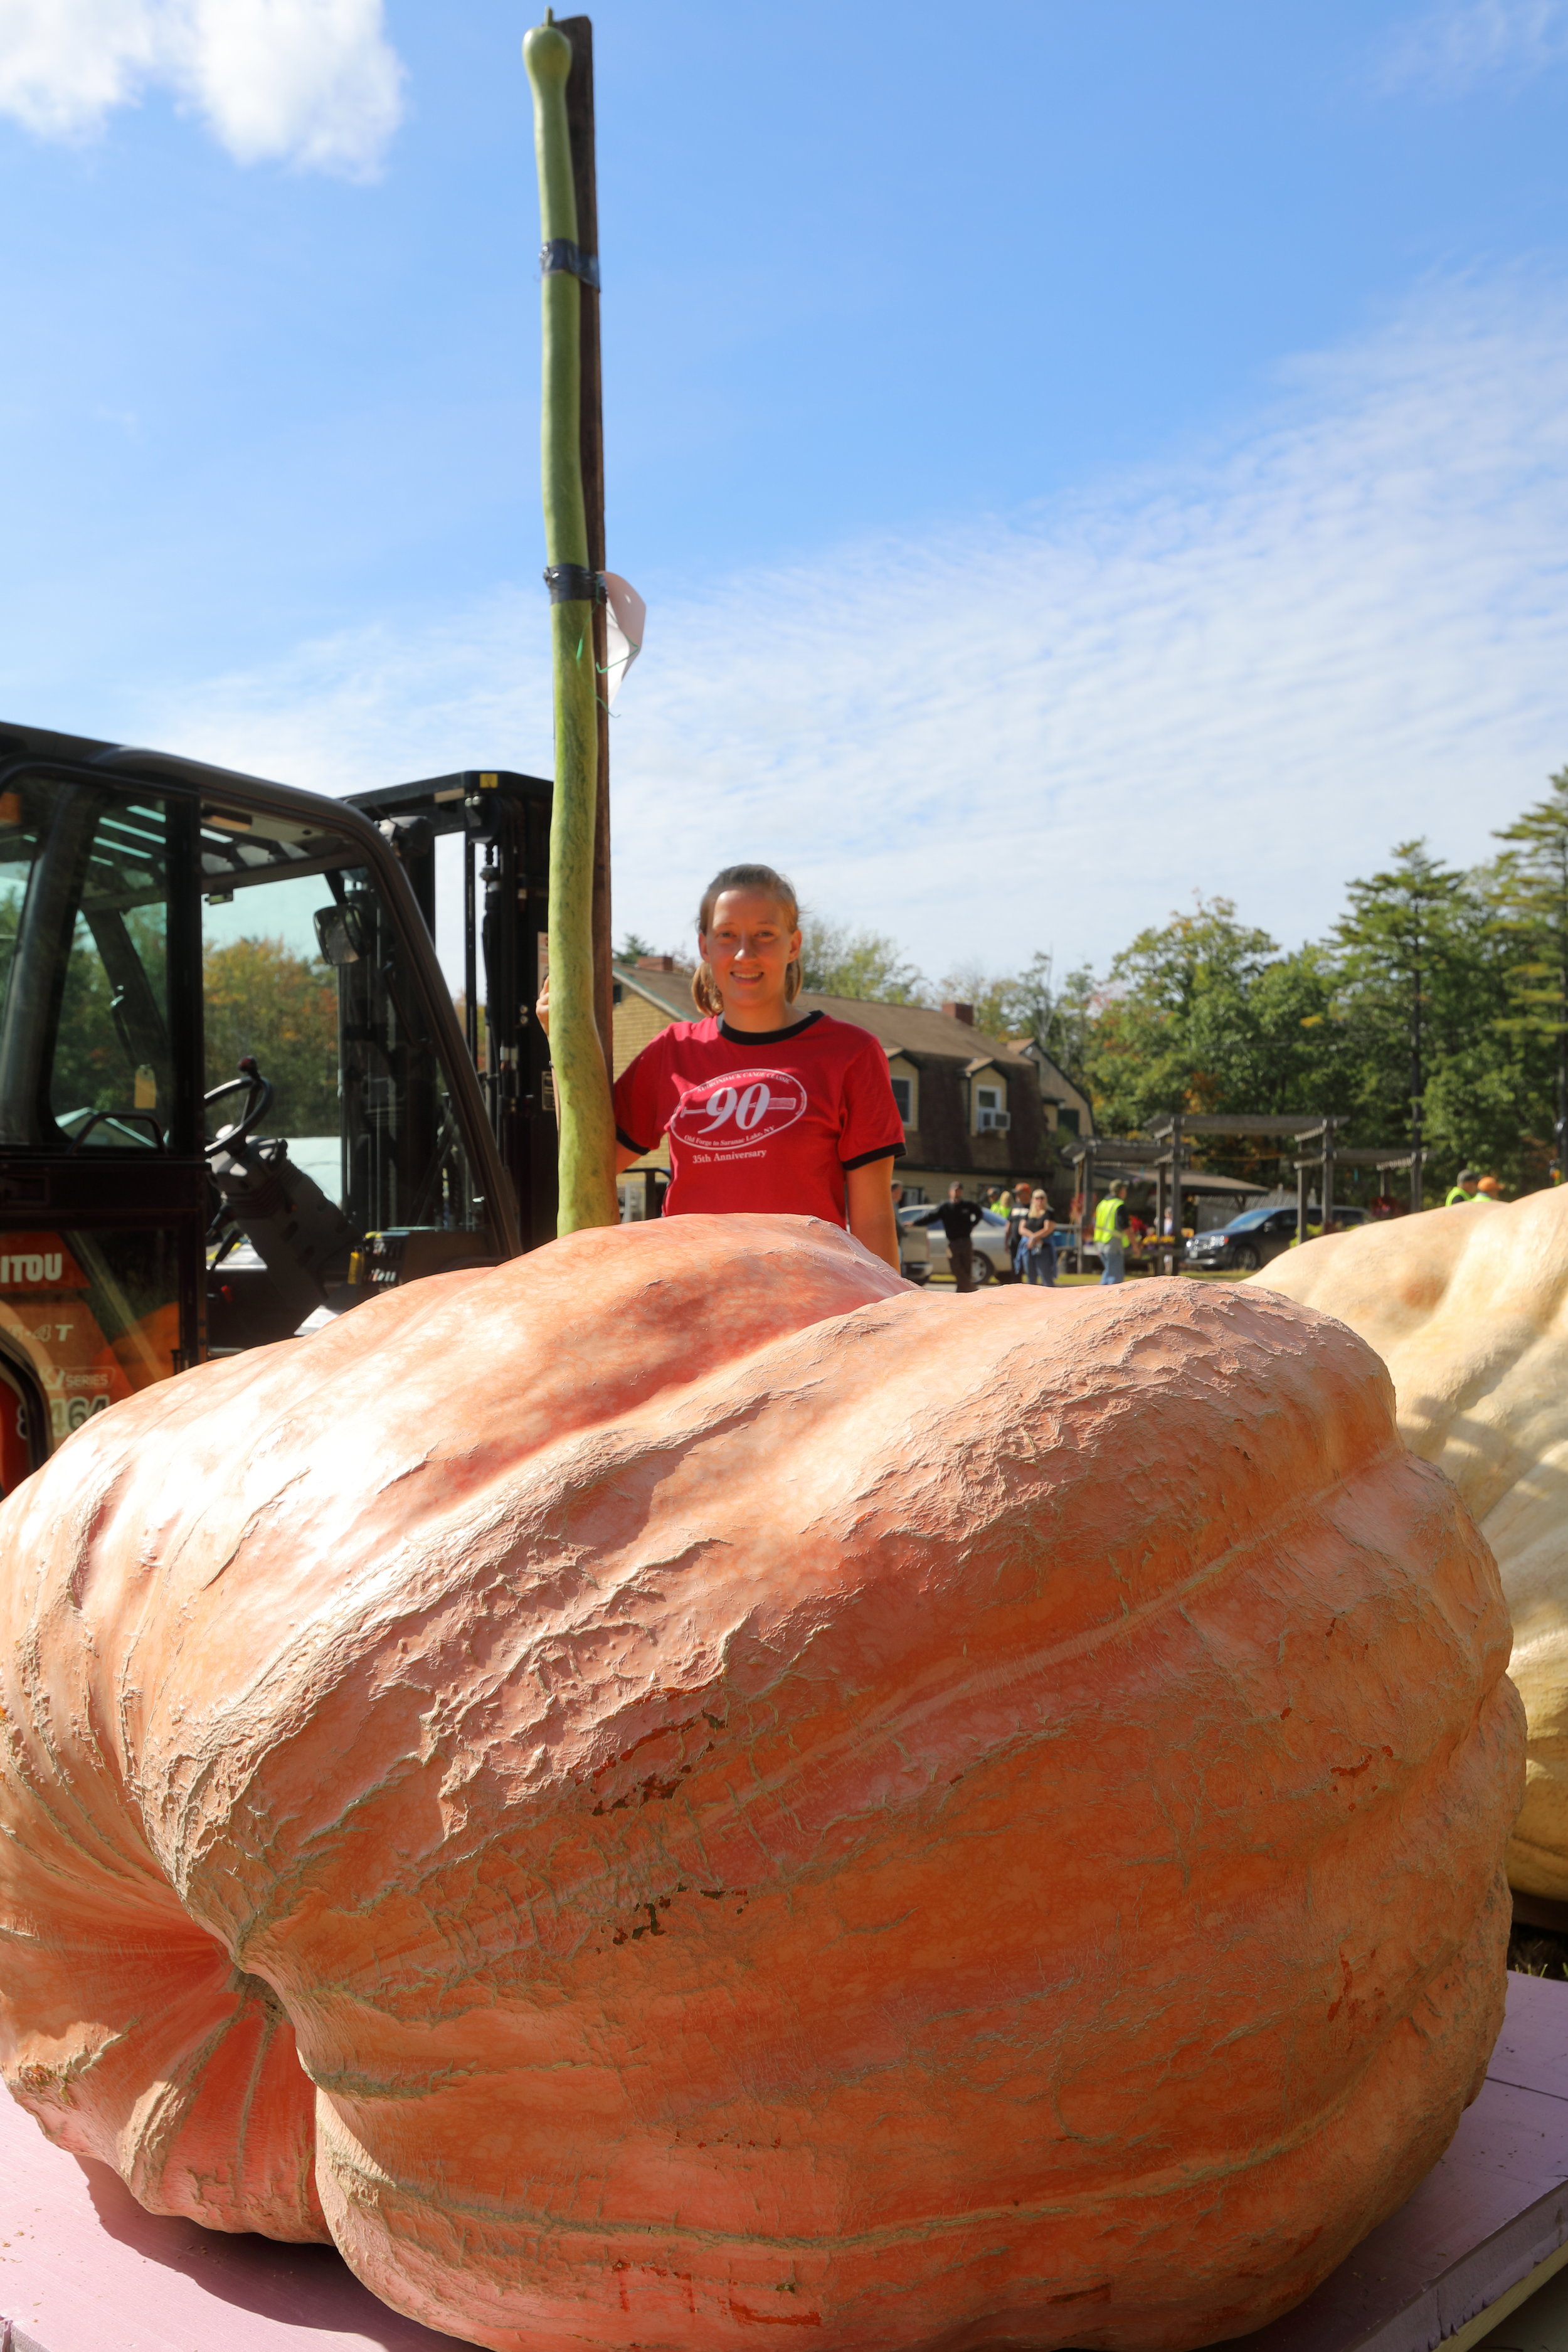
Watson ended up weighing in at 1521.5 pounds. This was my first pumpkin over 1500 pounds, so I was very excited! Watson was second place in the state of Maine, which meant we got to ride in the float in the Damariscotta Pumpkinfest!

Dale and I also paddled in the Pumpkinboat Regatta (we dressed as Mario and Luigi). Unfortunately, Dale sank not once, but twice, because his pumpkin was too small! He was famous on NBC Nightly News, and it was a hoot! Watson and I were also famous in the Bangor Daily News here.


Parting Words
Einstein said it best: “The definition of insanity is doing the same thing over and over again and expecting different results”. Do your research. Read the diaries of top growers and figure out what they’re doing that you’re not. Do something different and see what happens. Maine is the only state in New England that hasn’t grown a 2,000-pound pumpkin, and there is a surplus of information that is telling us how we can make that happen. I hope this article gives everyone something new to consider doing with their pumpkins this year. We’re all hungry to grow the first one-ton pumpkin, and I wish everyone good luck this growing season!

April 17

May 15

June 17 (pollination day)

June 25 (8 DAP)

July 5 (18 DAP)

July 14 (27 DAP)

August 8 (52 DAP)

May 6

June 9

Six lobes

June 25 (8 DAP)

July 5 (18 DAP)

July 21 (34 DAP)

August 30 (74 DAP)